My first full-length solo album, Haywire Frontier, is releasing on Saturday, September 9th on the Japanese label Tokinogake. It is available for preorder now, and you can listen to the opening track “Trickster Deity.”
Here are the liner notes:
In 2008, at the age of 11, I created Googology Wiki on my parents’ computer. “Googology” is word for the study of large numbers and fast-growing functions, deriving from the 9-year-old Milton Sirotta’s coinage of the term “googol.” The website was never meant to go beyond my personal use, and I gradually drifted away from it. Fifteen years later, it has grown to tens of thousands of articles and a community of hundreds of active users.
Haywire Frontier is a 40-minute musical tribute to a strange corner of amateur mathematics whose growth I somewhat-inadvertently catalyzed, with rhythmic and formal material deriving from Georg Cantor’s “ordinal number” system, integral to the study of large numbers.
The album was sequenced and synthesized entirely in SuperCollider with no samples, external hardware, or third-party plugins.
I wasn’t able to get this post fully complete in time for my self-imposed monthly deadline. I have decided to put it up in an incomplete state and clean it up in early September. I hope it is informative even in its current condition, which gets increasingly sketchy towards the end. Open during construction.
Among DSP types, those unfamiliar with wavelets often view them as a mysterious dark art, vaguely rumored to be “superior” to FFT in some way but for reasons not well understood. Computer musicians with a penchant for unusual and bizarre DSP (for instance, people who read niche blogs devoted to the topic) tend to get particularly excited about wavelets purely for their novelty. Is the phase vocoder too passé for you? Are you on some kind of Baudelairean hedonic treadmill where even the most eldritch Composers Desktop Project commands bore you?
Well, here it is: my introduction to wavelets, specifically written for those with a background in audio signal processing. I’ve been writing this post on and off for most of 2023, and while I am in no way a wavelet expert, I finally feel ready to explain them. I’ve found that a lot of wavelet resources are far too detailed, containing information mainly useful to people wishing to invent new wavelets rather than people who just want to implement and use them. After you peel back those layers, wavelets are surprisingly not so scary! Maybe not easy, but I do think it’s possible to explain wavelets in an accessible and pragmatic way. The goal here is not to turn you into a wavelet guru, but to impart basic working knowledge (with some theory to act as a springboard to more comprehensive resources).
Before we go further, I have to emphasize an important fact: while wavelets have found many practical uses in image processing and especially biomedical signal processing, wavelets are not that common in audio. I’m not aware of any widely adopted and publicly documented audio compression codec that makes use of wavelets. For both audio analysis alone and analysis-resynthesis, the short-time Fourier transform and the phase vocoder are the gold standard. The tradeoffs between time and frequency resolution are generally addressable with multiresolution variants of the STFT.
There is no one “wavelet transform” but a huge family of methods. New ones are developed all the time. To limit the scope of this post, I will introduce the two “classical” wavelet transforms: the Continuous Wavelet Transform (CWT) and Multiresolution Analysis (MRA). I’ll also go over popular choices of individual wavelets and summarize their properties. There are other wavelet transforms, some of more musically fertile than CWT or MRA, but you can’t skip the fundamentals before moving on to those. My hope is that demystifying wavelet basics will empower more DSP-savvy artists to learn about these curious creatures.
The Duration Trick is something I was egotistical enough to believe I discovered, but after a recent conversation with William Fields (a musical hero of mine) I have learned that I’m in no way the first to come across it. Both Fields and the Max/MSP Shop Boys have been using something like this for a while, I’m told. Learning about this case of convergent evolution spurred me to bump up this already-planned post in the queue.
Simply put, the Duration Trick is when a synthesizer patch with discrete note on/off events is given advance notice of the duration of each note. Thus, if the sequencer is modeled as sending messages to a synthesizer:
Every “note on” message is accompanied with an anticipated duration.
It’s possible for such a patch to exactly anticipate the ending of the note, so note offs don’t even need to be transmitted, although I like to give the option to cut off the note prematurely. Additionally, duration can function as a velocity-like parameter that impacts other synthesis parameters such as amplitude or brightness, so short and long notes differ in more ways than just timing.
Imagine a monophonic subtractive synthesis patch with a lowpass filter that gradually opens for each note on. Traditionally, the lowpass filter’s trajectory is independent of the note duration, and may run its course or be cut short:
With duration information, it’s possible to guarantee that the lowpass filter reaches a precise goal at the end of each note:
I find the second example slightly more exciting in this simple demonstration. For a more complex example, jump about an hour into a video session I uploaded in May. The Duration Trick may sound like a small change at first, but it had a pretty radical impact on my music and sound design when I started using it. It shines especially for transitional sweeps that need to arrive right on time. Arguably, anyone who drags a reverse cymbal sample leading up to a drop is in a sense using the Duration Trick.
Note off events in MIDI can arrive at any time, so the Duration Trick isn’t achievable with standard traditional synthesizer hardware in the absence of some CC-based hack. (This is one of many reasons that pigeonholing everything into MIDI events has had long-term negative effects on music tech, but I digress.) The Duration Trick is therefore easiest to implement in one of the “nerd” music software environments like Csound, SuperCollider, etc., particularly anything that permits scripting. The trick is possible in a real-time context, but the sequencer must of course be able to look ahead far enough to know the durations at all, so it’s more semi-real-time than fully real-time. Durations are always available for music sequenced offline, and are generally available in algorithmic composition as well.
Musicians who play or sing melodies generally don’t think in individual note ons and offs, but rather phrases and gestures if not something higher-level. Even the most reactive and on-the-fly improvisations often require calculating at a few notes ahead, and this will impact subtleties of playing style. The Duration Trick alone doesn’t capture the complexities of musicians playing acoustic instruments, but it still appears to be a valuable stepping stone to breathing some more life into a synth patch.
Decades after Curtis Roads’ Microsound, granular synthesis is making appearances here and there in the commercial plugin market. While it’s nice to see a wider audience for left-field sound design, I have my quibbles with some of the products out there. From what I’ve heard, so many of these products’ demos are covered in reverb in obvious compensation for something, showing that the plugins seem most suited for background textures and transitional moments. In place of sound, the developers seem to prioritize graphics — does watching 3D particles fly around in a physics simulation inspire the process of music production, or distract from it?
Finally, and most importantly, so many granular “synths” are in fact samplers based on buffer playback. The resulting sound is highly dependent on the sampled source, almost more so than the granular transformations. Sample-based granular (including sampling live input such as in Ableton Live’s Grain Delay) is fun and I’ve done it, but in many ways it’s become the default approach to granular. This leaves you and me, the sound design obsessives, with an opportunity to explore an underutilized alternative to sampled grains: synthesized grains.
This post introduces a possibly novel approach to granular synthesis that I call Correlated Granular Synthesis. The intent is specifically to design an approach to granular that can produce musical results with synthesized grains. Sample-based granular can also serve as a backend, but the idea is to work with the inherent “unflattering” quality of pure synthesis instead of piggybacking off the timbres baked into the average sample.
Correlated Granular Synthesis is well suited for randomization in algorithmic music context. Here’s a random sequence of grain clouds generated with this method:
This post is my attempt at explaining my own philosophy of sound design. It’s not in final form, and subject to amendment in the future.
The type of sound design I refer to is specific to my own practice: the creation of sounds for electronic music, especially experimental music, and especially music produced using pure synthesis as opposed to recorded or sampled sound. These ideas presented might have broader applications, but I have no delusions that they’re in any way universal.
The theory I expound on isn’t in the form of constraints or value judgements, but rather a set of traits. Some are general, some specific, and my hope is that considering how a sound or a piece relates to these traits will take me (and possibly you) in some directions not otherwise considered. Some of the traits contain assertions like “if your sound does X, your audience will feel Y,” which in a composition may be employed directly, carefully avoided, or deconstructed. You’ll also note that the theory is concerned mostly with the final product and its impact on the listener, not so much the compositional or technical process. (Friends and collaborators are well aware that I use highly idiosyncratic and constrained processes, but those are less about creating music and more about “creating creating music.”)
No theory of sound design will replace actually working on sound design. Sound design isn’t a spectator sport, nor a cerebral exercise, and it has to be practiced regularly like a musical instrument. Reading this post alone is unlikely to make you a better sound designer, but if it’s a useful supplement to time spent in the studio, I’d consider this work of writing a success.
I will deliberately avoid talking about the topics of melody, harmony, counterpoint, consonance vs. dissonance, and tuning systems, and I’ll only talk about rhythm abstractly. There are many existing resources dedicated to these topics in a wide variety of musical cultures.
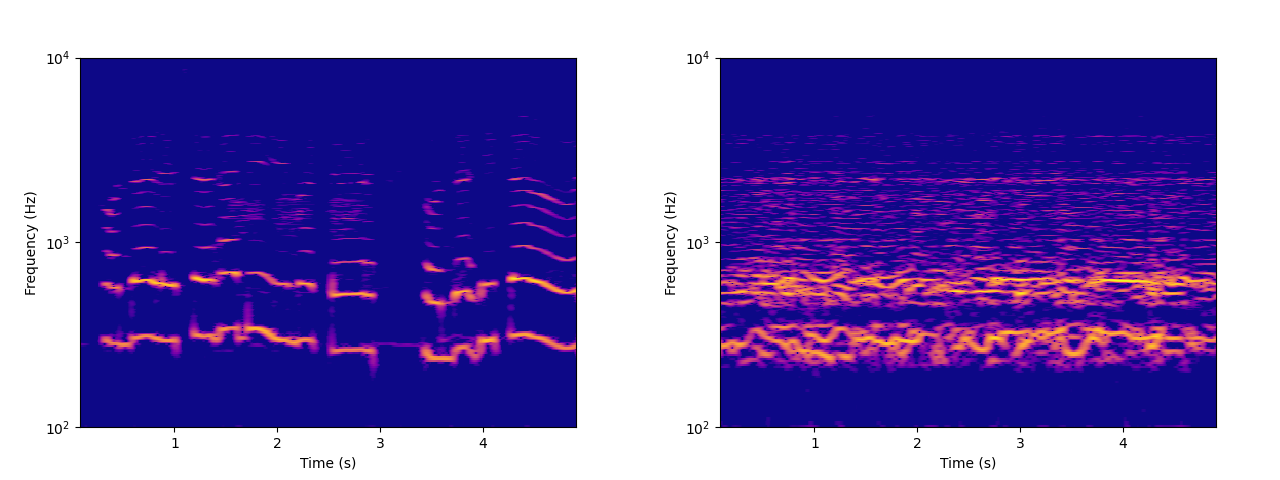
Left: spectrogram of a child singing. Right: spectrogram of resynthesized audio.
Background
I was alerted to audio texture resynthesis methods by a student of mine who was interested in the collaborative work of researcher Vincent Lostanlen, musician Florian Hecker, and several others [Lostanlen2019][Lostanlen2021][Andén2019][Muradeli2022]. Their efforts are built on an analysis method called “Joint Time-Frequency Scattering” (JTFS) based on the Continuous Wavelet Transform. In an attempt to understand the work better, I binged a wavelet transform textbook, [1] implemented a simplified version of JTFS-based resynthesis, and and briefly exchanged emails with Lostanlen. His helpful answers gave me the impression is that while JTFS is a powerful analysis technique, resynthesis was more of a side project and there are ways to accomplish similar effects that are more efficient and easier to code without compromising too much on musicality.
Audio texture resynthesis has some history in computer music literature [Schwartz2010], and some researchers have used resynthesis to help understand how the human brain processes audio [McDermott2011].
After some experimentation with these methods, I found that it’s not too hard to build a simple audio texture resynthesizer that exhibits clear musical potential. In this blog post, I’ll walk through a basic technique for making such a system yourself. There won’t be any novel research here, just a demonstration of a minimum viable resynthesizer and my ideas on how to expand on it.
Algorithm
The above-mentioned papers have used fancy techniques including the wavelet transform and auditory filter banks modeled after the human ear. However, I was able to get decent results with a standard STFT spectrogram, then using phase reconstruction to get time-domain audio samples. The full process looks like this:
Compute a magnitude spectrogram \(S\) of the time-domain input signal \(x\). A fairly high overlap is advised.
Compute any number of feature vectors \(F_1(S),\, F_2(S),\, \ldots,\, F_n(S)\) and define their concatenation as \(F(S)\).
Initialize a randomized magnitude spectrogram \(\hat{S}\).
Use gradient descent on \(\hat{S}\) to minimize the error \(E(\hat{S}) = ||F(S) - F(\hat{S})||\) (using any norm such as the squared error).
Use phase reconstruction such as the Griffin-Lim algorithm on \(\hat{S}\) to produce a resynthesized signal \(\hat{x}\).
The cornerstone of making this algorithm work well is that we choose an \(F(S)\) that’s differentiable (or reasonably close). This means that the gradient \(\nabla E\) can be computed with automatic differentiation (classical backpropagation). As such, this algorithm is best implemented in a differentiable computing environment like PyTorch or Tensorflow.
The features \(F(S)\), as well as their relative weights, greatly affect the sound. If \(F(S)\) is highly time-dependent then the resynthesized signal will mimic the original in evolution. On the other hand, if \(F(S)\) does a lot of pooling across the time axis then the resynthesized signal will mostly ignore the large-scale structure of the input signal. I’m mostly interested in the latter case, where \(F(S)\) significantly “remixes” the input signal and disregards the overall structure of the original.
We will represent \(S\) as a 2D tensor where the first dimension is frequency and the second is time. As a matrix, each row is an FFT bin, and each column a frame.
If using a fancy alternative to the magnitude spectrogram such CWT or cochlear filter banks, you may have to do gradient descent all the way back to the time-domain samples \(x\). These analysis methods break down to linear frequency transforms that produce complex numbers followed by computing the absolute value of each bin, so differentiability is maintained.
I’m often asked where to find the best resources for learning SuperCollider. My informed and professional answer, which comes from over a decade of experience with this software as a user, developer, and educator, is as follows:
I’m not really sure?
The landscape of SC learning materials has changed a lot since I started in 2012/13. I’ve heard good things about Eli Fieldsteel’s video tutorials and Bruno Ruviaro’s “A Gentle Introduction” ebook, so I guess check those out. I haven’t perused their tutorials at length, but Eli and Bruno are both seasoned professionals at SC education, so you can’t really go wrong there. Also, I have my own SuperCollider Tips blog post (which I have just updated today), which is not a structured tutorial but addresses common beginner problems. But ultimately, the most efficient learning strategy really depends on what you intend to make, because the applications for SC are so diverse, as are the backgrounds of users coming to SC.
That’s probably not too enlightening. However, I do have a lot of advice for beginning SC users, drawing from my own tortuous path through learning to make electronic music.
What follows are a bunch of guidelines that I recommend beginning SC users follow, or at least consider. A good number of them are specific to my idiosyncratic approach to SC, which I’ve expounded on in my YouTube presence: heavy focus on sound design through synthesis, and only sporadic use of hardware and real-time interaction. Also, although some of my advice may help live coders, I’m pretty uninterested in live coding myself, so I can’t give specific advice there (creative coding I’m all for, but when I share my screen it’s for education, not seamless performance art).
One blog post I’ve been meaning to write for a while is a comprehensive review of the design of dynamic range compressors and limiters, both digital and analog. Textbook compressor designs can be easily found, but like reverbs there are lots of weird little tricks from both hardware and software designs that supposedly define the distinctive musical character of different compressors. It may be a while before I finish that post because, while I’ve read a lot about the DSP of compressors, I don’t feel yet qualified to write on design. I haven’t yet designed a compressor plugin that I’m happy with, nor done a lot of compressor wine tasting, and the musical and psychoacoustic aspects of compressors are to me at least as important as the signal math.
Nevertheless, there’s a weird corner of compressor design that I feel inspired to talk about, and it’s called negative compression. It’s a feature of a few commercial compressors; I’m not sure which was the first, but I first learned about the concept from Klanghelm DC1A. Negative comp is the source of considerable confusion – just watch the Gearspace pundits go at it.
The brief description is that a standard compressor, upon receiving a signal with increasing amplitude, will reach a point where the output amplitude will increase at a slower rate. If the compressor is a perfect limiter, the output amplitude will hit a hard limit and refuse to increase. A negative compressor takes it further – the output signal will eventually get quieter over time as the amplitude increases. If you feed a percussive signal into a negative compressor and drive it hard enough, it will punch a hole in the signal’s amplitude, and can split a transient in two. It can be a pretty bizarre effect, and seems underutilized.
This explanation should be enough for most, but you know this blog. We do the math here. In this post, I will explain the basic mathematics of compressors to demystify negative compression, propose variants of negative compressors, and demonstrate how to do negative compression in SuperCollider.
Exactly three years ago I made an ambient EP under the name “Interstate Hydra” and put it up on Bandcamp. Up until now I have kept this alias a secret and only shown these tunes to a few people, but I figured it’s been long enough.
Nocturnes was made entirely in Audacity using the “sound dumplings” method described in an earlier post. This was a total 180 from my usual workflow, which is to synthesize everything with SuperCollider code.
“For Ellie” is a single released months after Nocturnes, and is formally the simplest Interstate Hydra track, comprising a row of sound dumplings in arch form.
I don’t plan on returning to the Interstate Hydra alias for quite some time, but I hope you enjoy these tracks. Thank you for listening.
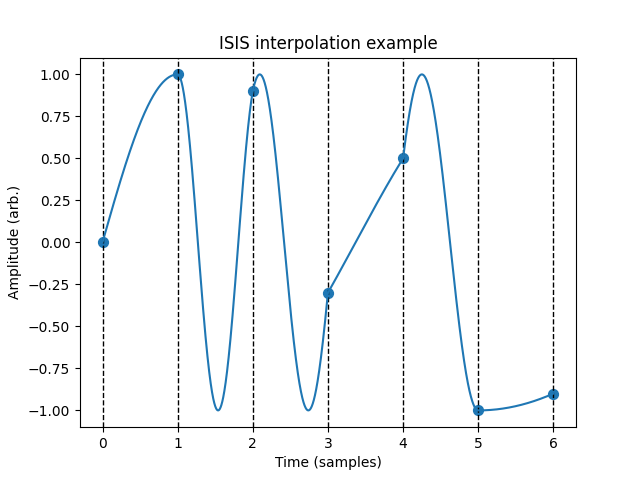
In 2005, Clarence Barlow published a paper on Intra-Samplar Interpolating Sinusoids (ISIS), an audio analysis-synthesis algorithm. It did not make much of a splash, with the paper having only 7 citations in Google Scholar. Nevertheless, it produces some interesting sounds, so let’s dive into it.
First, some context. The precursor to ISIS is a technique Barlow calls spectastics. In this method, the short-time Fourier transform is computed of an audio signal, and at each frame, the magnitude spectrum is resampled logarithmically to 12EDO and used as a probability distribution to select a pitch. The pitch sequence forms an extremely rapid melody, which can be synthesized or played on a robotic instrument. Barlow describes the spectasized melody as “remarkably like the original sound recording.”
In ISIS, this concept is taken to an extreme by making the “melody” a constant amplitude sine wave whose frequency is changed every sample. Given a digital signal that doesn’t exceed ±1, we can interpolate between any two successive samples with a partial cycle of a sine wave. An image helps here; the dots show the sampled digital signal.
For example, if the samples are 0 and 1, as seen in the first two samples in the image, we can interpolate with a quarter sine wave with a period of 4 samples and a frequency of 1/4th the sample rate. There are actually infinitely many ways to do this interpolation. For example, from 0 to 1 we can also have a sine wave that completes 5/4ths of a cycle. We can even assume that the initial phase of the sine wave is \(\pi\) and the final phase \(5\pi/2\), or have the sine wave going backwards with phase ramping from 0 to \(-3\pi/2\).
To resolve the ambiguity, ISIS restricts the frequency to be always nonnegative so the phase never goes backward, and always assumes the phase at every sample point is in the range \([-\pi/2, \pi/2]\) modulo \(2\pi\). There are other approaches, such as picking the minimum possible nonnegative frequency or the frequency of minimum absolute value, which may produce interesting alternative sounds. I won’t get into these (this is a relatively low-effort post), but feel free to try them out.