Steganography is my second album. Eleven tracks, 30 minutes. Fully synthesized. Distributed by 3OP. Digital download on Bandcamp.
Vertex Figurine
Growing Plums in the Desert
Why Becoming Selfish is the Best Thing I Ever Did
Unmaker Process
Despite Our Best Efforts
Warring Factions
Irreversible Information Acquisition
Things Toxic Friends Say
Systematic Instinct
Stab Variation
Treachery
Mastering by Nil Hartman.
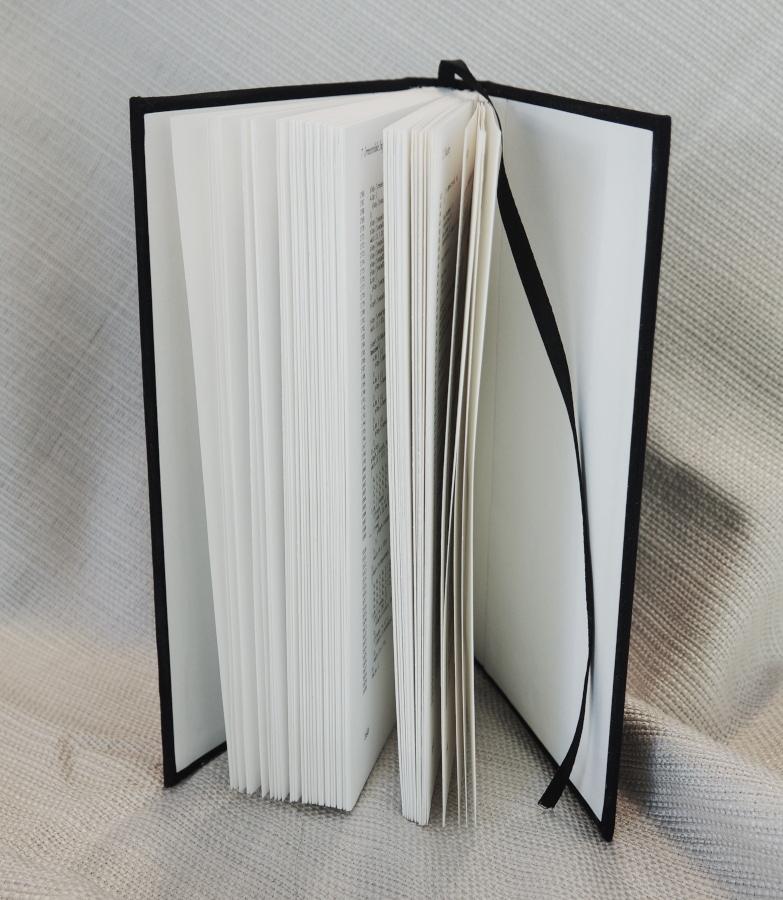
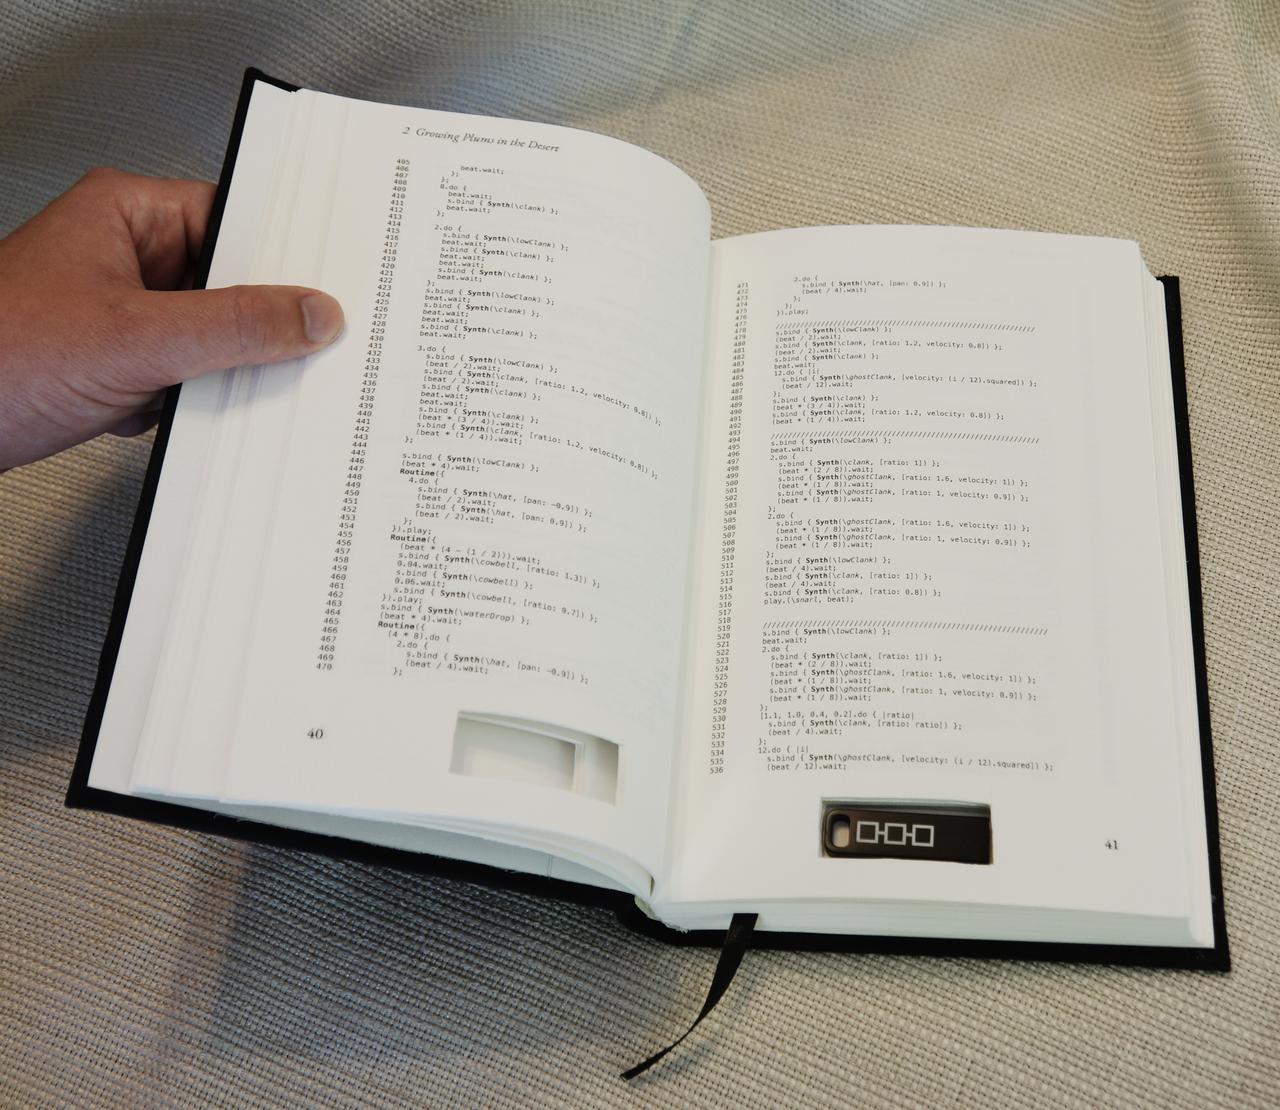
Available as a hand-bound 250-page hardcover book containing the complete SuperCollider source code to the album. A hole cut in it contains a USB stick with 48k/24 audio files. Limited run of five books. I am making them all by hand. (I may make another batch if they sell out, but no promises!)
The source code is not available digitally. These books are the only place to get it.
Striations of Grace, a collaborative album on by Lime68k and me, has been announced on EVEL Records, releasing October 3rd on digital, CD, and a 7” vinyl edition. Seven tracks, 53 minutes of cosmic horror synthesis mutations.
Lime68k & Nathan Ho - SOLVE
Nathan Ho - The Kraken
Lime68k - Out to Own Concern
Lime68k & Nathan Ho - We Regret the Error I
Lime68k - Who’s Out Concerns [vinyl release side A]
Nathan Ho - Exterior Algebra and Heroin [vinyl release side B]
Lime68k & Nathan Ho - We Regret the Error II
Lime68k used Max/MSP, I used SuperCollider. One year in the making.
A while back, I tried recreating the sound of a dialup modem from scratch, which involved a dive into multiple PDFs of telecommunication standards. (I am not the first person to do this.) Very helpful was Windy Tan’s beautiful analysis breaking down a spectrogram of a real dialup handshake. A particularly famous bit is the nasal mid-low “whine” at the end of the handshake, and if you’ve ever wondered what that is, you’re hearing line probing signals L1 and L2, which are synthesized using additive synthesis. The exact partial frequency, phases, and amplitudes are specified in section 10.1.2.4 of ITU-T V.34. They’re at 9 seconds in this recording of a modem by thearchiveguy99 on Freesound:
WARNING: Audio files in this post are loud and piercing. Please turn up your speakers to extremely painful levels for optimal telecommunication.
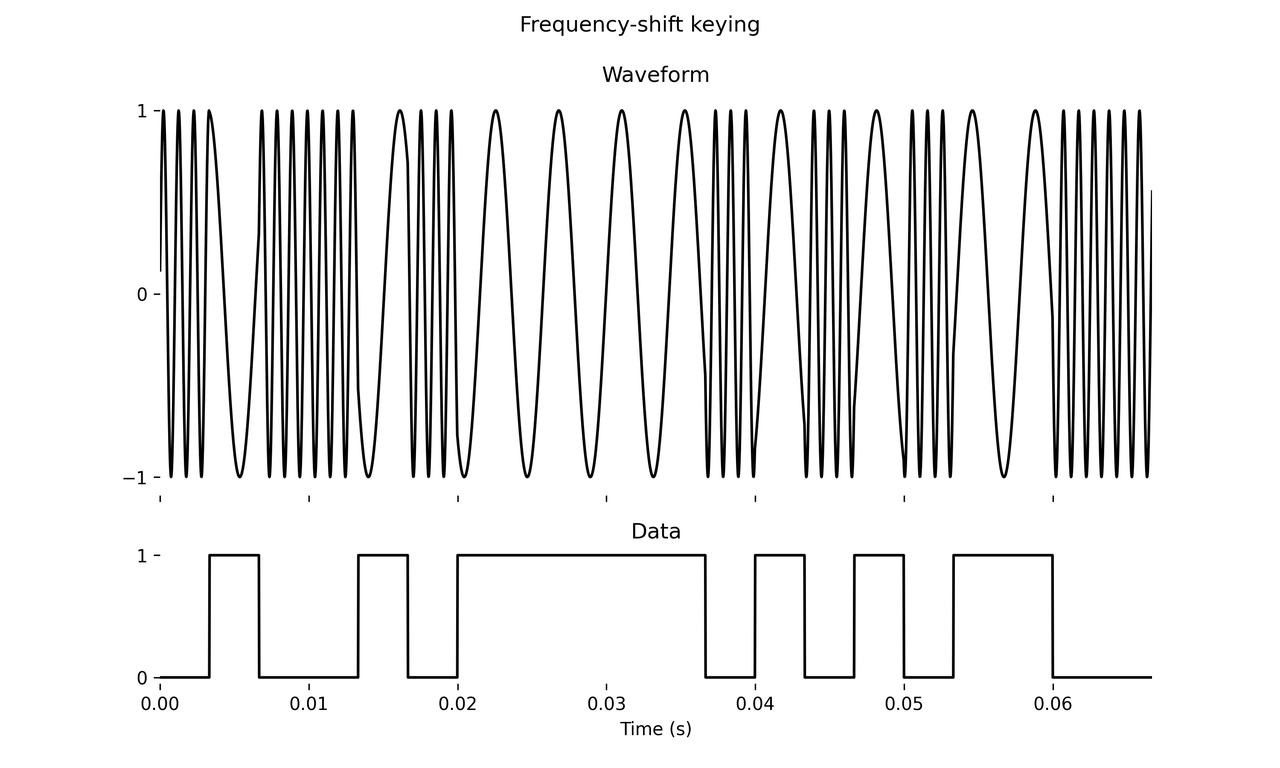
The whine is legendary, but I want to turn your attention to high-frequency gurgles before it, starting at about 4 seconds in, some of them resembling slurping a last bit of soda through a straw in a McDonald’s cup. These tones, specified at a high level in ITU-T V.8bis, are encoded using frequency-shift keying (FSK) as given in the lower-level ITU-T V.21 spec. In its simplest form, FSK uses a single sine wave to encode a binary signal by modulating its frequency. Following V.21’s description of a “channel 1” signal, at regular intervals of 1/300 seconds, a single bit is transmitted. If the bit is 0, the sine wave’s frequency is set to 1180 Hz. If the bit is 1, the frequency is set to 980 Hz.
Yep, that’s a dialup gurgle. The graph below demonstrates this visually (for different parameters — I had to lower the carrier for the 1 bits so that the distinction between the two is obvious). Above we have the audio waveform, below it the data signal.
Designing that dialup imitation made me realize that I really like how FSK sounds purely as a sound design tool. This got me looking into its various siblings, which are known as the “digital modulation” schemes for transmission of digital signals over an analog medium such as radio. In contrast, in “analog modulation” the signal being transmitted is continuous, encompassing familiar techniques like FM, AM, and single-sideband modulation. Today we’re going to honor the long tradition of adapting telecommunications methods for creative use by seeing what kind of sounds we can design by directly listening to signals produced with FSK and related methods. I call this approach Digital Modulation Synthesis, a name I’m not in love with, but I couldn’t think of a better one. It may be abbreviated to the cooler-sounding “DM Synthesis.”
In telecommunications, modulation is only half the story, and you also need a demodulator which takes the transmission signal and gets the data back. Engineering modulators and demodulators in a way that’s robust to noise is an interesting problem subject to nearly a century of study, but here we’re going to be the weirdos who just want to listen to the modulated signal itself. I will spend no time here discussing the engineering tradeoffs of these digital modulation schemes in a telecommunication settings; those problems are very interesting and deep but not relevant to this post.
This post is pretty light on math, and the DSP isn’t fancy here, as our concentration is more on sound design and synthesis. All this should be doable in SuperCollider, Pd, Max, etc. with pre-existing units.
I didn’t research this post as thoroughly as I would have liked, so it’s not impossible that I have misrepresented things from the telecommunications literature. If there are mistakes, sorry about that.
Synthesizer forums have a long-running joke about “Gear Acquisition Syndrome” that pictures the stereotypical hobbyist with all their Hainbach-endorsed gear, seemingly oblivious to the fact that they’re intended for making music. Trite as the joke is, the culture that reduces synthesizers to boutique furniture deserves all the mockery it gets. I’m a bit annoyed that I don’t remember who said this: Eurorack is millennials’ equivalent of model trains.
A lot of the audience of this blog is electronic music DIYers and open source fanatics, and many of us have good reasons to sneer at this culture. I myself own very little music hardware and basically never use VSTs, and I admit I feel a little smug when I read about how much money people can blow on synths and even plugins. Then I remember my own history with electronic music.
When I was first getting into SuperCollider — my first ever experience making electronic music — I found my way to DSP conference papers and became totally obsessed. I read every DAFx paper that seemed remotely interesting to me; I learned C++ to implement these in my own UGens. I was pretty certain that with enough effort I could replace any VST plugin I read about.
I thought I was being clever circumventing GAS by building everything myself, but what really happened is that I had fallen into my own version of GAS: I had System-Building Syndrome. System-building can be personally enriching, and no doubt more cost-effective than buying roomfuls of synths, but if your mission is to produce and release music then getting into engineer mode will actively hinder your efforts to do so. When I sat down to make music with all the nice fancy UGens I made, my music sucked. It discouraged me from making more music, so I’d spend more time building UGens since clearly I didn’t have enough of them.
I would like to congratulate wavesets (not wavelets) for entering their 30th year of being largely ignored outside of a very small circle of computer music nerds. Introduced by Trevor Wishart in [Wishart1994] and popularized by Microsound[Roads2002] and the Composers Desktop Project, a waveset is defined as a segment of an audio signal between two consecutive upward zero crossings. For simple oscillators like sine and saw waves, wavesets divide the signal into pitch periods, but for general periodic signals there may be any number of wavesets per period. For signals containing noise or multiple pitches at once, waveset segmentation is completely unpredictable.
Many simple audio effects fall out of this idea. You can reverse individual wavesets, omit every other waveset, repeat each waveset, sort them, whatever.
I like waveset-based effects best on input signals that are monophonic (having only one pitch) and low in noise. Synthetic signals can make for particularly interesting results. Much as the phase vocoder tends to sound blurry and phasey, waveset transformations also have their own “house style” in the form of highly digital glitches and crackles. These glitches are particularly pronounced when a waveset-based algorithm is fed non-monophonic signals or signals containing strong high-frequency noise. Wavesets are extremely sensitive to any kind of prefiltering applied to the input signal; it’s a good idea to highpass filter the signal to block dc, and it’s fun to add pre-filters as a musical parameter.
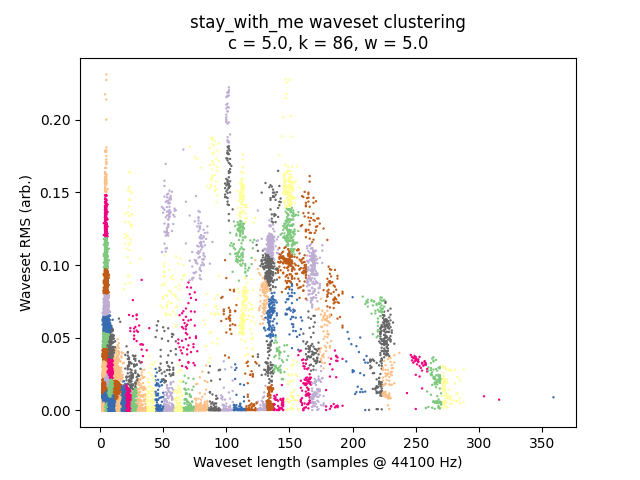
Today, we’re putting a possibly new spin on wavesets by combining them with basic statistical learning. The idea is to perform k-means clustering on waveset features. The steps of the algorithm are as follows:
Segmentation: Divide a single-channel audio signal into \(N\) wavesets.
Analysis: Compute the feature vector \(\mathbf{x}_i\) for the \(i\)-th waveset. I use just two features: length \(\ell_i\), or number of samples between the zero crossings, and RMS \(r_i\) of the waveset’s samples. All the lengths are compiled into a single size-\(N\) vector \(\mathbf{\ell}\) and the RMSs into \(\mathbf{r}\).
Normalization: Scale \(\mathbf{\ell}\) and \(\mathbf{r}\) so that they each have variance 1.
Weighting: Scale \(\mathbf{\ell}\) by a weighting parameter \(w\), which controls how much the clustering stage emphasizes differences in length vs. differences in amplitude. We’ll talk more about this later, but \(w = 5\) seems to work as a start.
Clustering: Run k-means clustering on the feature vectors \(\mathbf{x}\), producing \(k\) clusters.
For each cluster, pick one representative waveset, the one closest to the centroid of the cluster.
Quantization: In the original audio signal, replace each waveset with the representative waveset from its cluster.
Implementation is very lightweight, clocking in at about 30 lines of Python with scikit-learn. There are only two parameters here other than the input audio: \(w\) and \(k\). [1] The length of the input audio signal is important too, so for musical reasons let’s not think in terms of \(k\) but rather “clusters per second” \(c\), which is \(k\) divided by the signal length in seconds. As we will see, with only two-dimensional control we can produce a tremendous variety of sounds.
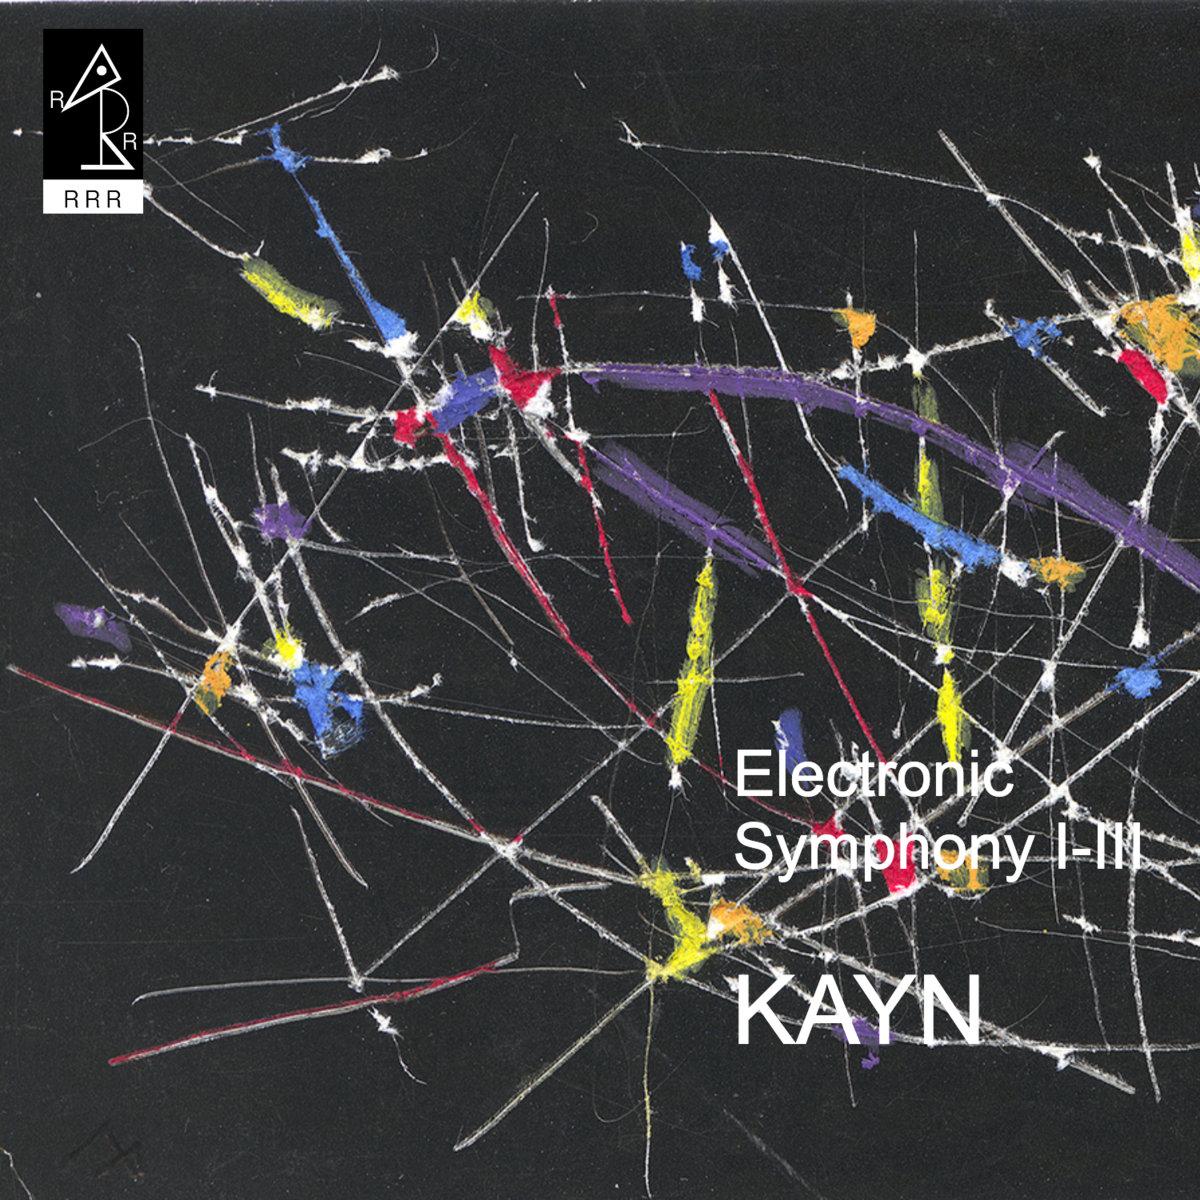
Let’s open this post with music. If you aren’t familiar with the late composer Roland Kayn’s work, listen to one of his Electronic Symphonies, or at least sample a few minutes. The album cover links to his official Bandcamp.
I found out about Kayn’s music through a thread on Lines, and it gets only more interesting as I looked into his story. Kayn was an exponent of combining music with cybernetics, a field I gloss as “the study of feedback systems.” At its heart, it’s a mathematical study; Norbert Wiener’s original text Cybernetics is chock full of integrals and differential equations. As the field developed, it overlapped significantly with medicine, social sciences, humanities, and especially critical theory. I do hope to read Wiener’s Cybernetics and The Human Use of Human Beings, but haven’t gotten around to them, so consider my understanding of the field surface-level — I’m mainly concerned with cybernetics as it relates to Kayn’s music.
Kayn began making cybernetics-influenced electronic works in university electronic music studios in the 60’s. We don’t know what exact tools, but Pickles’ 2016 dissertation Cybernetics in music surmises that the equipment back then was something along the lines of tape machines and basic analog processors and generators: oscillators, noise, filters, reverbs, envelope generators, ring modulators. More intriguingly, recordings of his works were entirely real time — a stark contrast to the offline tape-based processes of the contemporary musique concrète movement. Critic Frans van Rossum wrote in 2011 that Kayn worked with a “network of electronic equipment” and a “a system of signals or commands that it can obey and execute” (quote also via Pickles).
EDIT 2023-12-20: An earlier version of this post credited the technology to Kayn alone, but I have since been properly schooled: it was Jaap Vink who actually built the system, as Sascha Frere-Jones wrote in 4Columns. Given the intimacy that cybernetic musicians necessarily have with their tools, his fingerprints are deeply embedded in Kayn’s electronic works. The sources I looked at didn’t make this clear to me, and most don’t even mention Vink by name. Vink referred to himself as a technician, not a composer, and it’s possible that the concealment of his status was his preference.
That these works were likely made on 60’s equipment, were recorded in real time, and sound varied and dynamic over long stretches of time should impress anyone familiar with modular synths. The implications that his musical systems had some kinds of self-generating and autonomous properties makes this even more remarkable. Now Kayn’s output is more than just great music, it’s now a puzzle. How did he make this music? Can we recreate part of his process?
I don’t think we’ll ever get definitive answers. Kayn died in 2011, Vink in January 2023. While there’s a small body of writing about them, little of it is technical. We can only guess, but we have some resources that helps us with the guessing process — the Lines thread I mentioned, and also La Synthèse Humaine, a YouTube channel run by musician Émile Zener a.k.a. Gunnar Haslam. He takes direct inspiration from Kayn, and unlike me has extensively studied the cybernetics literature. I won’t take the time to resummarize the Lines thread or Zener’s work — just go check them out for yourself — instead I am interested in expanding on them.
Making a cybernetic LFO
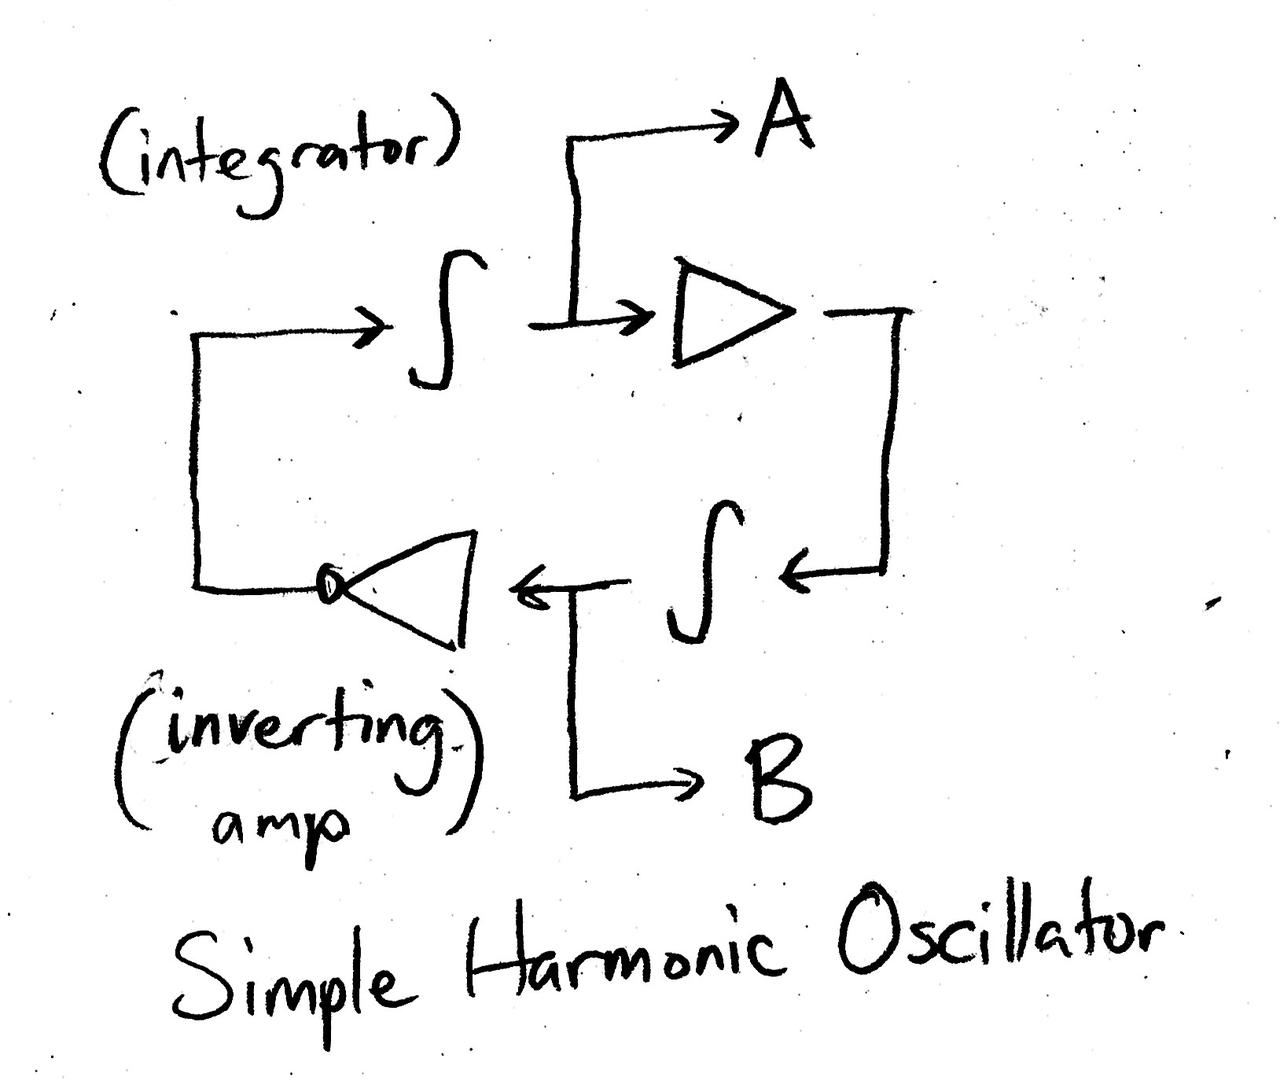
It’s perhaps easiest if I first walk you through a concrete example of building a cybernetic patch. We begin with the simple harmonic oscillator, which can be implemented with the system of ordinary differential equations
This comprises two integrator stages in a feedback loop. An integrator is a unit that continuously accumulates the input signal (you can get something like a leaky integrator with a one-pole lowpass filter with a very low cutoff). The triangles are simple amplifiers multiplying by constants; one must be negative and the other positive. There are two outputs, A and B, which produce a sine and cosine wave respectively. The system does need an initial “kick” to generate sine waves, by e.g. initially setting \(a(0) = 1\) and \(b(0) = 0\).
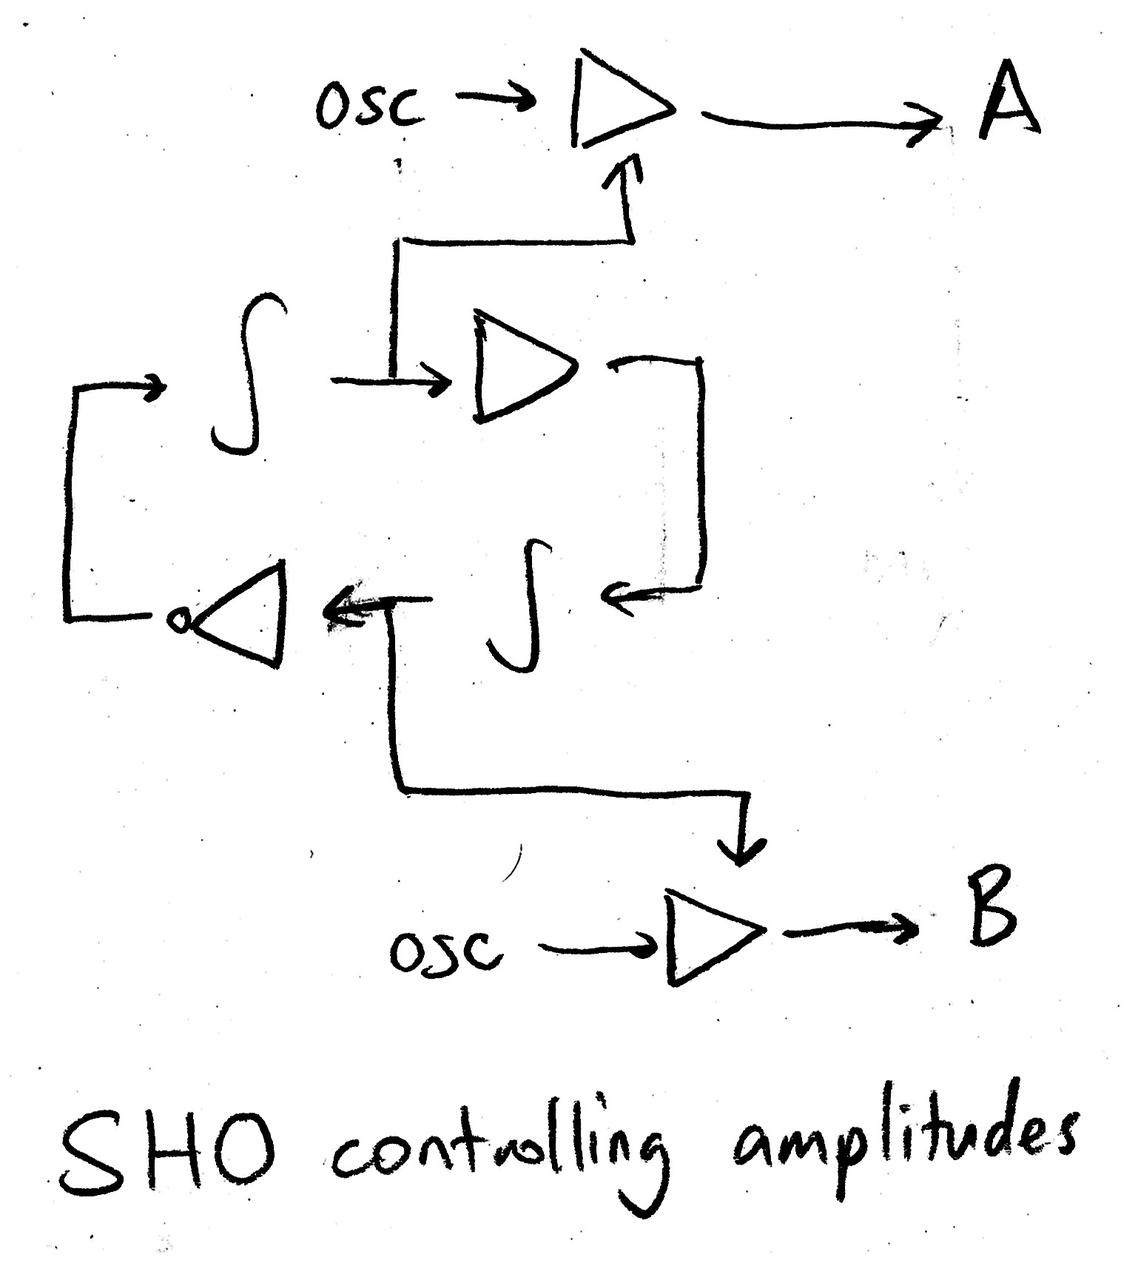
Assume that the oscillator is tuned to oscillate at a slow 1 Hz. It is an “LFO” in the literal sense that it oscillates at a low frequency, but critically we aren’t generating it with an actual oscillator module, and the oscillation is an emergent property of the system that we built. We can turn this into an audible synthesis patch by using the two outputs, A and B, as amplitudes, multiplying them with VCAs by two saw oscillators with static frequencies. Mixing the oscillators together, we have a simple looping alternation between two “notes” even though we have no actual sequencer here.
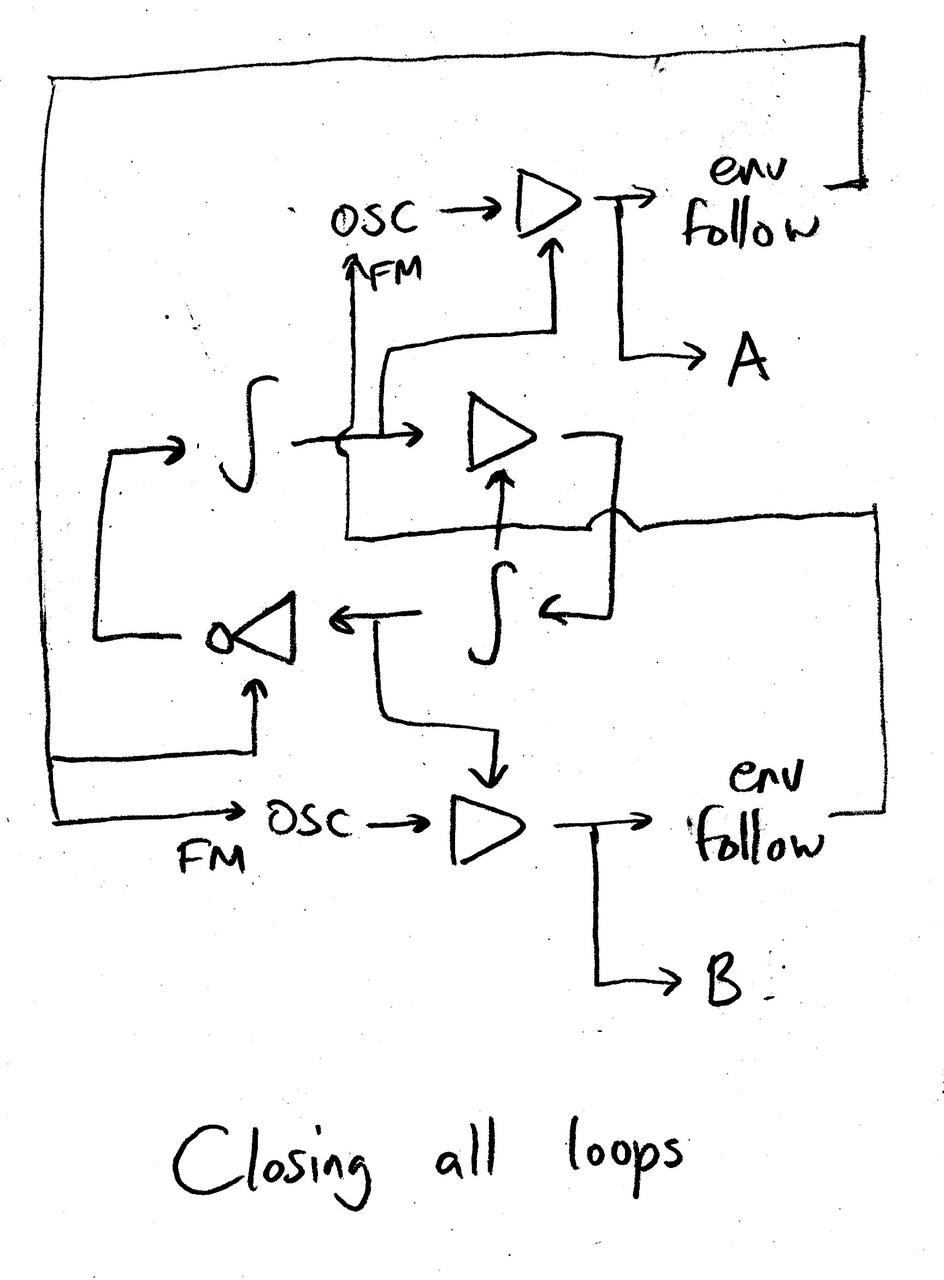
However, the oscillators and VCA’s aren’t part of a loop, and their output does not influence the rest of the system. For reasons that I’ll justify later, we loop in their VCAs by running an envelope follower on the output of the VCAs, and using it to modulate the coefficients of other VCAs that are in the loop.
(I’m misusing notation here a bit; the arrows into the loop VCAs are not actually setting the gain, but wiggling around the gain it had in the previous diagram. The intentions of this diagram are more romantic than schematic — the point is to illustrate the closing of loops, not to specify an exact algorithm.)
This isn’t an actual simple harmonic oscillator anymore, but it mimics the core behavior of one. However, if we start changing any parameter, the core behavior of the “LFO” starts changing too. Everything interacts with everything, and nothing is isolated or purely upstream or purely downstream.
We’ll return to this patch and expand it into something more compelling in sound design terms. Let’s go theoretical for a bit and explain what we’re actually trying to do here.
As 2023 ends, it seems like a good time to reflect and allow myself some vanity. It’s also a few days shy of the 15th anniversary of the first thing I created on the Internet (a certain wiki I have mentioned before). Amusingly, I’m really doing the same thing as I was back then: publicly writing about niche technical subjects. Back then it was mathematics, now music technology.
I set a goal for myself to release at least one substantial technical blog post every month this year, and succeeded:
Meeting the monthly deadline required pushing myself a little, but I’m glad I set this schedule, because the self-imposed time constraints forced me to scope projects realistically and suppress perfectionism. Often all I needed to do for a blog post was to find an exciting topic and demonstrate its value with some nice sounds; there’s a time and place for thorough research and literature review, but I’m okay without it for most projects here. I also felt the variety is beneficial, since it helped me gauge my level of interest in various music tech topics and, more importantly, my audience’s. I don’t have analytics or a comment section, but I do hear from readers by email occasionally (thank you!), and this helps me understand what kind of writing is most wanted in the music tech community.
Speaking of engagement, now’s a good time as any to announce that I will be pivoting to topics suggested to me by this free online Blog Idea Generator:
Much like the previously discussed wavelet transforms, the cepstrum is a frequency-domain method that I see talked about a lot in the scientific research literature, but only occasionally applied to the creative arts. The cepstrum is sometimes described as “the FFT of the FFT” (although this is an oversimplification since there are nonlinear operations sandwiched in between those two transforms, and the second is really the Discrete Cosine Transform). In contrast to wavelets, the cepstrum is very popular in audio processing, most notably in the ubiquitous mel-frequency cepstral coefficients (MFCCs). Some would not consider the MFCCs a true “cepstrum,” others would say the term “cepstrum” is broad enough to encompass them. I have no strong opinion.
In almost all applications of the cepstrum, it is used solely for analysis and generally isn’t invertible. This is the case for MFCCs, where the magnitude spectrum is downsampled in the conversion to the mel scale, resulting in a loss of information. Resynthesizing audio from the cepstral descriptors commonly used in the literature is an underdetermined problem, usually tackled with machine learning or other complex optimization methods.
However, it is actually possible to implement audio effects in the MFCC domain with perfect reconstruction. You just have to keep around all the information that gets discarded, resulting in this signal chain:
Take the STFT. The following steps apply for each frame.
Compute the power spectrum (square of magnitude spectrum) and the phases.
Compute a bank of bandpass filters on the power spectrum, equally spaced on the mel-frequency scale. This is the mel spectrum, and it downsamples the magnitude spectrum, losing information.
Upsample the mel spectrum back up to full spectral envelope. Divide the magnitude spectrum by the envelope to produce the residual spectrum. (You have to add a little epsilon to the envelope to prevent zero division.)
Compute the logarithm and then the Discrete Cosine Transform of the mel spectrum to produce the MFCCs.
Perform any processing desired.
Invert step 5: take the inverse DCT and then the exponent to produce the mel spectrum.
Invert step 4: upsample the mel spectrum to the spectral envelope, and multiply it by the residual spectrum to produce the power spectrum.
Recombine the power spectrum with the phases to produce the complex spectrum.
Inverse FFT, then overlap-add to resynthesize the signal.
It’s a lot of steps, but as an extension of the basic MFCC algorithm, it’s not that much of a leap. I would not be surprised if someone has done this before, storing all residuals when computing the MFCCs so the process can be inverted, but I had difficulty finding prior work on this for the particular application of musical effects. Something similar is done in MFCC-based vocoders, where the “residual spectrum” instead replaced with speech parameters such as pitch, but I haven’t seen this done on general, non-speech signals.
I will be testing on the following mono snippet of Ed Sheeran’s “Perfect.” (If you plan on doing many listening tests on a musical signal, never use a sample of music you enjoy.)
As for the parameters: mono, 48 kHz sample rate, 2048-sample FFT buffer with Hann window and 50% overlap, 30-band mel spectrum from 20 Hz to 20 kHz.
Cepstral EQ
Because of the nonlinearities involved in the signal chain, merely multiplying the MFCCs by a constant can do some pretty strange things. Zeroing out all MFCCs has the effect of removing the spectral envelope and whitening the signal. The effect on vocal signals is pronounced, turning Ed into a bumblebee.
Multiplying all MFCCs by 2 has a subtle, hollower quality, acting as an expander for the spectral envelope.
MFCCs are signed and can also be multiplied by negative values, which inverts the phase of a cosine wave component. The effect on the signal is hard to describe:
We can apply any MFCC envelope desired. Here’s a sine wave:
Cepstral frequency shifting
Technically this would be “quefrency shifting.” This cyclically rotates the MFCCs to brighten the signal:
And here’s the downward equivalent:
Cepstral frequency scaling
Resampling the MFCCs sounds reminiscent of formant shifting. This is related to the time-scaling property of the Fourier transform: if you resample the spectrum, you’re also resampling the signal. Here’s upward scaling:
Here’s downward scaling:
Cepstral time-based effects
Here’s what happens when we freeze the MFCCs every few frames:
Lowpass filtering the MFCCs over time tends to slur speech:
Stray thoughts
I have barely scratched the surface of cepstral effects here, opting only to explore the most mathematically straightforward operations. That the MFCCs produce some very weird and very musical effects, even with such simple transformations, is encouraging.
In addition to playing with additional types of effects, it is also worthwhile to adjust the trasforms being used. The DCT as the space for the spectral envelope could be improved on. One (strange) possibility that came to mind is messing with the Multiresolution Analysis of the mel spectrum; I have no idea if that would sound interesting or not, but it’s worth a shot.
It’s possible to bypass the MFCCs and just do the DCT of the log-spectrogram. I experimented with this and found that I couldn’t get it to sound as musical as the mel-based equivalent. I believe this is because the resolution of the FFT isn’t very perceptually salient. The mel scale is in fact doing a lot of heavy lifting here.
I have been experimenting a lot with finding ways to get more acoustic sounds out of synthesizers. These sounds don’t need to be perfect recreations of any particular real instrument, but I want a piece of the complexity and depth that those have, and also to investigate “Pinocchio” synth patches that fall short of becoming a real boy in hopefully interesting ways.
Computer music types often jump to physical modeling, a field that I adore and have casually researched. But with the exception of modal synthesis, most physical modeling paradigms take considerable software engineering tenacity to get good results — especially the finite difference models, but waveguides too. I do intend to explore them further, but also I believe that some cool sounds can come out of chains of completely ordinary oscillators and effects. In my experiments, I’ve come across a bunch of little tricks that can help lend some more realism to those kinds of synth patches. Many of these also apply to sophisticated physical models too (after all, physical models can’t deliver you from having to do sound design).
In general, randomize everything a little bit and modulate everything with a slow, smooth random LFOs.
Real percussive envelopes have a very tall initial spike. Inspecting the waveform of an unprocessed xylophone hit, I was surprised by how loud the transient of a typical percussive instrument is compared to its resonating tail.
The high dynamic range can make such sounds tough to bring up in the mix, and can often be addressed by adding clipping or similar distortion that only gets driven during the initial transient. This improves “bite” as well. However, acoustic sounds by nature have higher dynamic range, and clipping and compression can take away from that. Find a balance that works for you.
Key tracking (modifying synth parameters based on register) is essential. No acoustic instrument has the same physics in every register, and some have very limited pitch range in the first place. I usually at least key track amplitude and the cutoff of a lowpass filter. Don’t get discouraged if something sounds good in one octave but bad if you transpose it. You may even need an entirely different patches for different octaves.
In a tonal percussive synth, it’s essential that partials decay at different rates. A rule of thumb for damped physical resonators is that the decay time is roughly proportional to the inverse of the square of frequency. For example, going up an octave will multiply the decay time by about 0.25. This is not only true of partials within a note, but even of different keys of many mallet instruments. (In a piano, different registers have different physical constructions including different numbers of strings per key, which I believe is specifically compensating for this phenomenon.)
Synthesized drums made using oscillators benefit from some subtle stereo detuning.
You can spruce up standard ADSR or percussive envelopes by using multiple little spikes in sequence, a bit like an 808 clap envelope. These spikes can be obvious or subtle.
Add little noise bursts and puffs to every sharp transient. Delay the noise bursts relative to each other a little bit and randomize all properties slightly. Even if the bursts are subtle, the effect will add up tremendously. Noise doesn’t need to be white or pink; crackly impulsive noise is fun too, and more metallic noise is possible using banks of bandpass filters or inharmonic FM.
Adding a little puff of noise before the transient can sound really nice for reed instruments, and I’ve gotten a pretty decent thumb piano sound with it by simulating the thumb scraping against the key. Watch yourself, Four Tet.
Add “box tone” to every sound source using a bunch of random peaking filters that boost different bands by +-2 dB (maybe more if you’re feeling adventurous!). Wiggle the parameters around slowly if desired, which is pretty ad hoc but might mimic physical changes in temperature, posture, grip of the instrument, etc. Box tone is a good idea in general to compensate for the relative cleanliness of an all-digital signal path. You can even use multiple layers of wiggly EQ with gentle nonlinearities sandwiched between them.
This is an obvious one, but almost all acoustic instruments have resonating bodies, so reverb can make or break the realism of a sound. Use slightly different subtle reverbs on every instrument, and prefer “weird” and metallic reverbs with short decay times. I often just use a bank of parallel comb filters; you can also use short multitap delays. The lush Alesis/Lexicon sound has its place in mixing, but I find that sound a little too smooth to work as an instrument body. Obviously, reverb on master is pretty essential if your instruments are in a concert hall.
Inharmonic modal synthesis (either with actual resonance or with decaying sine waves) can be enhanced with parallel ring modulation with one or more sine waves. This greatly multiplies the number of partials. I like to add a decay on the “modulator” sine waves. This works best for a grungy junk percussion sound, banging on pots and pans that aren’t carefully tuned by instrument builders.
It’s not just the patch, it’s the sequencing. Humanize velocity; don’t just completely randomize it, make the velocity follow the musical phrasing. Also, louder playing is correlated with higher timing accuracy, and conversely softer playing benefits from humanization in arrival times.
String players performing in detache style tend to crescendo a little bit when they anticipate the bow change for the next note. I’ve never played winds, but I wouldn’t be surprised if they did something similar.
For instruments that comprise a different physical source for every pitch (pianos, mallet instruments, pipe organs, harmonicas), try detuning each key by a tiny, fixed amount to emulate imperfections in the instrument. You can use a lookup table, but my favorite approach is to use the pitch to seed a random number generator; I use the Hasher UGen in SuperCollider a lot for this. Timbral parameters can be similarly randomized in this manner.
Haas effect panning: delay one channel and put it through a random EQ that’s sloped for high-frequency loss.
SuperCollider’s PitchShift is really great for adding a weird metallic “splash” which I mix back into the signal, sometimes fairly subtly. In general, find weird effects and use them in parallel at a low volume to simulate little imperfections that add up.
The notion that bass has to be mono is a total myth, and only matters today if your music is being pressed to vinyl. (Trust me, nobody is summing your stereo channels.) Low instruments can absolutely have stereo image and using that can make a mix sound less electronic.
If simulating an ensemble, some instruments will be further away than others, which can be mimicked with higher wet-dry ratio in a reverb and some high-frequency loss. This helps particularly for homogeneous ensembles like string orchestras.
Wind and string instruments require significant dexterity or physical exertion to reach the higher notes in their registers. To mimic this, random detuning should be more dramatic for higher notes.
Winds and strings playing legato are typically done with rapid portamento, which sounds fine. Realism can be further improved by briefly fading in some noise and/or high passing the source, simulating instability as the instrument physically transitions between consecutive notes.
Saw and pulse waves are pretty obviously synthetic and often need considerable massaging to sound remotely acoustic. Consider other sources if you aren’t getting success with those. Breakpoint synthesis (GENDY) is a favorite of mine.
Common mixing advice states that you should avoid putting effects or processing on anything unless necessary as demonstrated by A/B test. This is a wise idea for recordings, but in mostly synthesized music, a long chain of subtle effects can create an “imperfection cascade” that help get an extra 5% of realism. This only really helps if the sounds are already good enough to stand on their own.
Unisons of multiple instruments can sound more realistic as a whole than exposed instruments, since they can mask each other’s imperfections, especially if those instruments are very different from each other.
Slow parameter fluctuations happen not only for individual instruments, but for the entire ensemble, especially for a homogeneous group like a string quartet. Create an automation and map it to the intensity parameter of many instruments, which also fluctuate individually.
Thanks to all who checked out my album Haywire Frontier. Yesterday, I gave a remote talk for the NOTAM SuperCollider meetup on the project. The talk wasn’t recorded, but I decided to rework it into prose. This is partially for the benefit of people that missed the event, but mostly because I’m too lazy to research and write a new post wholly from scratch this month.
It’s not necessary to listen to the album to understand this post, but of course I would appreciate it.
Acceleration from notes to an entire piece
One of the earliest decisions I had to make while planning out Haywire Frontier was how to approach rhythm. I’m a huge fan of breakcore and old school ragga jungle (Venetian Snares’ work convinced me to dedicate my life to electronic music), and partially as a result of that, unpitched percussion and complex rhythms are central to a lot of my output.
However, I resolved pretty early on that I didn’t want the rhythmic material of the project to fall into the grids and time signatures of dance music. My reasons for this are nebulous and difficult to articulate, but I think a big part is that I wanted to challenge myself. When I make beat-based music, which I do frequently, I tend to think relative to established genres like drum-‘n’-bass or techno or house, and I mimic the tropes of what I want to imitate. Removing those guardrails, while still trying to make music conducive to active listening, puts me out of my comfort zone. I like to put myself in creative situations where I feel a little awkward or uncomfortable, because if there’s anything I personally fear in my creative output, it’s complacency. [1]
So beats are out. An alternative, which I have used a lot in the past, is a type of randomized rhythm I call the “i.i.d. rhythm,” or “Pwhite-into-\dur rhythm:”
SuperCollider code:
// NB: Full aggregated code from example, plus SynthDefs, are at the end of the post.
Routine({
    loop {
        s.bind { Synth(\kick) };
        rrand(0.03, 0.6).wait;
    };
}).play;
In these rhythms, the inter-onset intervals (IOIs), or time between successive hits, are chosen with a single random distribution. In statistics terms, the IOIs are i.i.d., or independently and identically distributed. The distribution is uniform in this example, but you can use log-uniform, or any distribution over the positive real numbers.
Every SuperCollider user has written one of these rhythms at some point. They’re perfectly serviceable for some applications. However, for rhythmic material that drives an entire percussion section, I have to admit that I find these tiresome and uninspiring. In one word, what these rhythms lack is phrasing.
If you were to grab a non-musician, give them a snare drum, and ask them to hit it “randomly,” their result would be nothing like this. They might produce a cluster of rapid hits, then silence, then a nearly steady rhythm, and modulate between all those approaches. That’s to say nothing of a free jazz drummer who’s spent years training to produce complex, compelling rhythms that may not fall on a grid. It’s well known to psychologists that humans are very bad at producing data that passes randomness tests; I view it as Geiger-counter-type rhythms failing to pass humanity tests.